How to Inspect Asphalt Work Quality
Published on: February 2, 2026 | Last Updated: April 14, 2025
Written By: George Voss
Inspecting asphalt work quality means verifying surface smoothness, thickness, compaction density (measured by ASTM D6932 standards), joint integrity, and texture consistency to catch flaws like cracks, potholes, or raveling. This process ensures roads and pavements last 15-25 years, prevents costly repairs, and meets safety codes like AASHTO M 323. Inspectors use tools like nuclear density gauges, infrared thermometers, and core drills to test materials at 275-325°F during installation.
This article explains how to spot poor asphalt work before it fails. You’ll learn industry standards for surface quality, step-by-step field checks, common defects like bleeding or uneven compaction, and best practices for documentation. We’ll cover tools like laser profilers for smoothness tests, core sampling methods, and how weather impacts results. Use these techniques to avoid budget-draining redos and ensure pavement performs as designed.
Contents
- Introduction to Asphalt Quality Inspection
- Importance Of Asphalt Quality Inspection
- Key Standards for Asphalt Work Quality
- Step-by-step Asphalt Work Inspection Process
- Common Asphalt Quality Defects to Identify
- Essential Tools &Amp; Methods for Asphalt Inspection
- Best Practices for Effective Quality Control
- Environmental &Amp; Safety Considerations in Asphalt Inspection
- Frequently Asked Questions (FAQ)
- Closing Thoughts
- Additional Resources for You:
Introduction to Asphalt Quality Inspection
Asphalt quality inspection confirms pavement meets design specs before opening to traffic. This process evaluates materials, placement methods, and final surfacing against industry benchmarks like ASTM D3515 or AASHTO M 323. Field teams employ gauges, thermometers, and core drills to measure thickness, density, and temperature during paving operations.
Key elements include verifying PG (performance-graded) binder content and aggregate gradation. PG binders, engineered for specific climate ranges, prevent rutting in heat or cracking in cold. Superpave mix designs, developed through strategic highway research, ensure optimal aggregate-binder ratios. Inspectors track mix temperatures—290–330°F for laydown—to avoid premature cooling that causes poor compaction.
Early defect detection—like raveling or uneven joints—reduces repair costs by 60% over a pavement’s lifecycle. Core samples extracted post-construction reveal air void percentages (3–5% ideal) and layer thickness (±0.15” tolerance). Subgrade checks confirm proper drainage slopes (≥2%) to prevent water damage.
Next, let’s examine why systematic asphalt work quality control impacts project outcomes beyond initial construction phases.
Importance Of Asphalt Quality Inspection
Inspecting asphalt work quality impacts how long pavements last, how much fixing costs, and if roads stay safe. Skipping this step risks structural flaws, rapid aging, and hazards for drivers or walkers.
Ensuring Longevity &Amp; Durability
Quality checks confirm that compaction hits 92-98% density with nuclear gauges. This stops air voids above 8%, which let water in. Inspectors also verify thickness within ±0.25 inches of plans. A 3-inch layer missing 0.5 inches cuts pavement life by 30%. Spotting thin spots or low-density zones during asphalt quality assessment stops cracks from forming within months.
Preventing Costly Repairs
Finding flaws early cuts repair bills by up to 60%. A single missed raveling patch can grow into a $2,500 pothole fix in two winters. Inspectors using infrared cameras catch hidden voids under surfaces. Fixing subgrade issues during asphalt work inspection avoids full-depth failures costing $15-$50 per square yard.
Compliance With Safety Standards
Local laws and OSHA rules demand smooth joints, slopes under 2%, and skid resistance above 35 BPN. A 0.3-inch bump at a seam can trip pedestrians, leading to liability claims. Quality control teams using laser profilers check for ADA-compliant surfaces. Non-compliant sites face fines up to $13,653 per violation under federal guidelines.
Focusing on durability, cost control, and safety prepares teams to tackle industry benchmarks. Next, look at specific criteria that define top-tier asphalt work.

Key Standards for Asphalt Work Quality
Meeting industry benchmarks ensures asphalt projects perform as intended. Five critical standards guide effective quality checks during asphalt work inspection.
Surface Smoothness
Use a 3-meter straightedge or profilograph to measure surface deviations. Tolerances typically allow ≤3mm variance over 3m lengths. Rough surfaces accelerate wear, increase water pooling risks, and reduce skid resistance. Check for roller marks, uneven joints, or depressions exceeding project specs.
Thickness Requirements
Verify layer depths with core samples extracted 24-48 hours after placement. Residential driveways need ≥2 inches, while highways require 4-12 inches based on traffic loads. ASTM D3665 mandates ±1/4 inch tolerance for compacted thickness. Thinner sections crack faster under load stresses.
Compaction Density
Achieve 92-95% of maximum theoretical density (Rice density) to prevent premature failure. Nuclear density gauges or sand cone tests measure in-place compaction. Low density (under 90%) creates air voids leading to moisture infiltration and raveling. Target 7% maximum air void content for optimal durability.
Joint Construction Integrity
Inspect longitudinal and transverse joints for proper overlap (50-75mm) and compaction. Poorly bonded joints develop thermal cracks within months. Use infrared thermography to detect temperature differentials above 25°F at seams, indicating weak adhesion. Sealant application must follow ASTM D6690 standards.
Texture Consistency
Evaluate macrotexture using sand patch tests or laser profilometers. Ideal mean texture depth ranges from 0.5mm (smooth parking lots) to 1.5mm (high-speed roads). Inconsistent textures signal uneven roller passes or mix segregation. Check for smooth patches exceeding 10% of the total area.
With these benchmarks confirmed, the next phase involves systematic field testing to catch defects before final approval.
Also See: Can You Heat Cold Patch Asphalt? Get Better Results
Step-by-step Asphalt Work Inspection Process
Effective inspection requires systematic methods to verify compliance with project specs. Follow this structured process to evaluate pavement quality at every phase.
Pre-inspection Preparation
Proper planning prevents oversights. Start by verifying tools are calibrated for precise measurement.
Gather Necessary Tools (Gauges, Thermometers, Core Drills)
- Infrared thermometers: Verify mix temperatures stay within 275°F–325°F during laydown
- Nuclear density gauges: Measure compaction levels on-site
- Core drills: Extract samples for lab testing
- Straightedges: Detect surface deviations exceeding 3/16″ over 10 feet
Review Project Specifications & Drawings
Cross-reference mix designs (PG 64-22 binders), thickness requirements (e.g., 4″ base + 1.5″ surface), drainage slopes (≥2%), and compaction targets (≥92% density). Note any Superpave or local DOT standards.
On-site Inspection Procedures
Field evaluations focus on spotting defects early. Prioritize critical issues impacting structural integrity.
Identify Critical Defects (Cracks, Uneven Surfaces)
Use straightedges to locate rutting ≥1/2″ deep or bumps exceeding 1/4″ height. Mark transverse cracks wider than 1/8″ for immediate repair under most state codes.
Check for General Defects (Frayed Edges, Discoloration)
Inspect longitudinal joints for proper overlap (3–6″). Note uneven texture or faded areas indicating inconsistent binder application.
Core Sampling for Thickness & Density Verification
Extract minimum three 4″-diameter cores per 1,000 sq yd. Confirm thickness (±1/4″ tolerance) via ASTM D2950. Lab-test cores for density using AASHTO T 166 methods.
Subgrade Condition Assessment
Test subgrade stability with proof rolling (10-ton vibratory roller) or dynamic cone penetrometer (DCP) readings. Ensure California Bearing Ratio (CBR) ≥8% before paving.
Post-inspection Documentation
Thorough records provide legal protection and guide future maintenance plans.
Record Measurements & Observations
- Log core sample results (e.g., 93.7% density, 4.2″ thickness)
- Photograph defects with scale references
- Note weather conditions during paving
Compare Results Against Industry Standards
Cross-check data with ASTM D6433 for surface regularity or AASHTO M 323 for mix designs. Flag deviations exceeding 5% from specs for contractor resolution.
Proper documentation sets the stage for resolving issues – next, we’ll explore common defects requiring corrective action.
Common Asphalt Quality Defects to Identify
Spotting flaws early prevents structural failures. These six defects signal subpar asphalt work needing immediate attention.
Raveling (Loose Aggregate)
Aggregate particles detach from the surface, creating rough textures. Causes include low PG binder content (below 5% by weight) or inadequate compaction during installation. Run gloved hands over suspect areas – if rocks dislodge, raveling exists.
Bleeding (Excessive Asphalt Binder)
Shiny black patches indicate excess bitumen rising to the surface. Common in hot-mix asphalt with >7% binder content. Bleeding reduces skid resistance – test with a British Pendulum Tester (target ≥45 BPN).
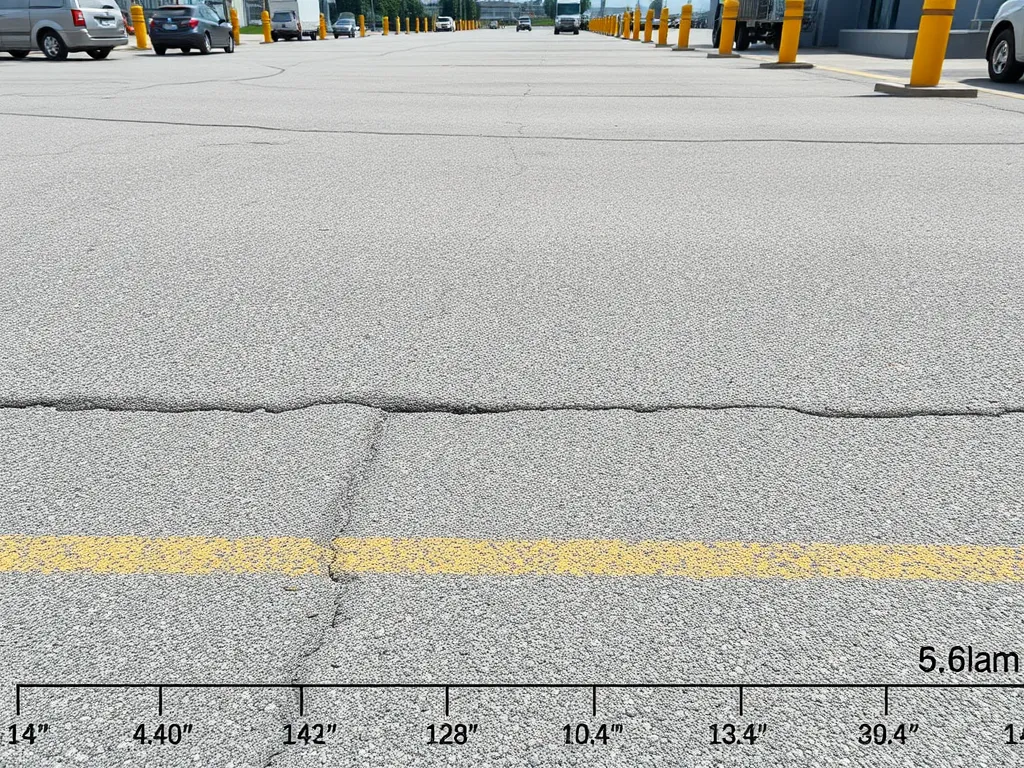
Cracking (Fatigue, Longitudinal, Transverse)
Fatigue cracks (alligator patterns): Poor subgrade support or <6-inch base layers. Longitudinal cracks (parallel to paving direction): Joint construction errors. Transverse cracks (perpendicular): Thermal contraction with air voids >10%.
Potholes &Amp; Depressions
Water infiltration weakens sublayers, causing bowl-shaped voids. Measure depth with a straightedge – depressions >¼ inch violate ASTM D6433. Check drainage slopes (minimum 2%) around affected zones.
Poor Compaction &Amp; Air Voids
Inadequate roller passes leave air voids >7-10%. Use nuclear density gauges (ASTM D2950) for spot checks. Low compaction (<92% target density) accelerates rutting.
Thickness Inconsistencies
Core samples must match design specs (typically 3-4 inches for driveways). Measure with calipers – variations >½ inch across 10-foot spans fail AASHTO T 344. Check milling depth if overlaying existing pavement.
Identifying these defects requires sharp eyes and precise tools. Next, let’s explore the gear and methods that make asphalt quality control systematic.
Essential Tools &Amp; Methods for Asphalt Inspection
Inspecting asphalt work demands a mix of hands-on tools and systematic protocols. From visual scans to lab analysis, each tactic adds layers of accuracy to quality control.
Visual Inspection Techniques
Start with a 360-degree walkaround. Look for cracks wider than 1/4 inch, uneven matting, or surface discoloration. Use a 10-foot straightedge—any gap over 3/8 inch under it flags poor smoothness. Watch for raveling (loose stones) or bleeding (shiny, sticky spots), which hint at binder issues. Daylight checks work best; shadows can mask defects.
Non-destructive Testing (NDT) Equipment
Infrared cameras map thermal segregation, showing temperature drops as low as 25°F in spots—a sign of weak bonding. Ground-penetrating radar (GPR) scans layers up to 12 inches deep, spotting voids or moisture pockets. Nuclear density gauges give instant compaction readings, aiming for 92-96% of maximum specific gravity (ASTM D2950).
Core Sampling &Amp; Laboratory Analysis
Cut 4-inch or 6-inch cores from random sites (per ASTM D3665). Lab tests verify thickness (±1/2 inch tolerance), bulk specific gravity, and asphalt content. A 5% air void range is typical; above 8% risks water damage. Binder extraction tests confirm PG grading—PG 64-22 binders must hold firm up to 64°C and flex down to -22°C.
Measurement Tools (Thickness Gauges, Density Probes)
Magnetic thickness gauges track mat depth during paving, syncing with GPS for real-time maps. Post-install, ultrasonic gauges check without cutting. Density probes—nuclear or non-nuclear—validate compaction. Target 95% density on roadways; parking lots can dip to 92%. Pair with infrared thermometers to link density to mix temps—below 185°F risks poor bonding.
Solid inspection tactics form only half the battle. Pairing tools with strict protocols turns data into action—a bridge to mastering long-lasting pavements.
With the right tools in hand, focus shifts to streamlining workflows for consistent outcomes.

Best Practices for Effective Quality Control
Maintaining strict protocols during asphalt work quality inspection prevents costly rework. Systematic methods paired with clear communication ensure projects meet specifications.
Documentation &Amp; Checklist Utilization
Use standardized asphalt inspection check lists to track mix temperature, compaction rates, or joint alignment. Digital tools like apps or spreadsheets log real-time data for later review. Documenting deviations—such as 5% density drops—creates accountability. Checklists also verify compliance with local codes like ASTM D3515 for hot-mix asphalt.
Random Sampling for Unbiased Assessment
Follow ASTM D3665 guidelines to select test locations without prior notice to crews. Pull 3-5 core samples per 1,000 tons to check thickness (typically 2-4 inches) or voids content (3-5% optimum). Random sampling during asphalt quality assessment reduces bias, exposing hidden flaws like segregated mixes or under-compacted edges.
Avoiding Conflicts With Paving Crews
Hold daily briefings to align expectations before work starts. Frame findings factually—cite measurable issues like “150°F lay temperature vs. required 275°F.” Stay solution-focused: propose rolling patterns or mix adjustments. Neutral language during asphalt paving quality control maintains collaboration while upholding standards.
Pre-construction Material Verification
Test aggregates for gradation (meeting DOT size specs) and binders for PG grading before trucks arrive. Reject batches with 0.5% excess moisture or inconsistent viscosity. Tools like nuclear density gauges or infrared thermometers verify materials meet asphalt quality inspection criteria. Catching flaws early avoids tearing up freshly laid pavement.
Beyond protocols, environmental factors play roles in project success—especially temperature shifts during curing.
Environmental &Amp; Safety Considerations in Asphalt Inspection
Inspecting asphalt work demands attention to external factors affecting performance and worker safety. These elements directly influence pavement lifespan and compliance with regulations.
Impact Of Temperature &Amp; Weather Conditions
Asphalt mixes require precise heat levels during installation. Paving below 275°F causes premature cooling, leading to uneven compaction. Above 325°F, binders degrade, creating brittle surfaces prone to cracking. Inspectors track material temps every 15 minutes using infrared thermometers. Thermal segregation – temperature drops over 25°F within 10 feet – triggers immediate corrections. Rain delays paving: just 0.1 inches of water lowers asphalt temps by 50°F in under 5 minutes.
- Monitor mix delivery tickets for PG binder grades (e.g., PG 64-22)
- Verify wind speed stays below 15 mph to prevent rapid cooling
- Check weather logs for ambient temps matching mix specifications
Proper Drainage Evaluation
Water infiltration causes 80% of asphalt failures. Inspectors measure cross slopes with 4-foot digital levels, ensuring 2% minimum grade. Look for birdbaths – depressions holding water – using laser scanners or string lines. Test catch basin flow rates with 5-gallon water pours, timing drainage under 30 seconds. Key checks:
- Inspect edge drains for debris blocking flow
- Verify permeable bases meet 0.5 in/hr infiltration rates
- Mark areas needing fog seals within 72 hours of paving
Safe Handling Of Testing Equipment
Nuclear density gauges and 60-pound core drills pose injury risks if mishandled. Field teams follow ASTM D3666 safety protocols:
- Wear Class 3 reflective vests within 10 feet of traffic lanes
- Calibrate torque wrenches monthly for coring rig stability
- Store asphalt probes in 40°F-80°F environments to prevent sensor drift
Thermal imaging cameras require 20-foot clearance from hot mix trucks during scans. Always lock gauge shutters when not taking readings to limit radiation exposure below 2 mR/hr.
With environmental factors documented, inspectors shift focus to physical indicators of subpar work…

Frequently Asked Questions (FAQ)
How Do You Test the Quality Of Asphalt?
Testing asphalt quality typically involves a combination of visual inspections, core sampling, and non-destructive tests, such as using nuclear density gauges or infrared thermometers to evaluate compaction and temperature. Essential metrics like surface smoothness, layer thickness, and air void content are also assessed to ensure compliance with industry specifications.
How Do I Know if My Asphalt Paving Job is Good?
A good asphalt paving job is characterized by a smooth surface, consistent thickness, proper compaction density, and well-constructed joints. Additionally, the absence of visible defects like raveling, cracking, or bleeding is indicative of high-quality work.
What Does a Bad Asphalt Job Look Like?
A bad asphalt job may present several signs, including uneven surfaces, visible cracks, raveling, excess bleeding, and thick inconsistencies. If you notice areas where the asphalt appears discolored or if there are depressions and potholes forming shortly after installation, it’s likely indicative of poor workmanship and materials.
How Can I Perform a DIY Asphalt Quality Check?
To perform a DIY asphalt quality check, observe the surface for any visible defects, take a straightedge to check for surface smoothness, and measure thickness at various points using a ruler or calipers. Note any cracks or areas of weakness, and ensure that the installation meets local tolerances and guidelines.
Closing Thoughts
Inspecting asphalt work is vital for guaranteeing quality and longevity. Proper assessment not only prevents costly repairs but also ensures compliance with safety standards. By following the outlined inspection process and keeping an eye out for common defects, you’ll maintain high-quality asphalt surfaces.
Utilizing the right tools and adhering to best practices leads to effective quality control. Environmental factors can impact asphalt performance, so remain mindful during inspections. Regular checks can significantly enhance durability and functionality.
For more detailed information on asphalt work quality and to utilize our helpful resources, check out Asphalt Calculator USA.

