DIY Asphalt Maintenance Tips: Protect &Amp; Extend Your Pavement’s Lifespan
Published on: November 16, 2025 | Last Updated: April 14, 2025
Written By: George Voss
DIY asphalt maintenance involves regular care and minor repairs homeowners can perform to preserve driveways and walkways. Unlike professional services, these tasks use basic tools like stiff-bristle brooms and affordable materials such as crack fillers ($15-$25 per gallon) or cold patch asphalt ($30-$50 per bag). Proper maintenance prevents potholes, cracks, and surface erosion while extending pavement life by 10-15 years. Start with cleaning debris, sealing cracks under ¼ inch, and applying sealcoat every 2-3 years.
This article breaks down five key maintenance steps, including drainage fixes and pothole repairs with cold mix asphalt. You’ll learn to avoid common errors like using concrete-based fillers on asphalt cracks or sealing in temperatures below 50°F. We’ll also compare products like rubberized vs. standard sealants and share eco-friendly options such as low-VOC coatings. From seasonal checklists to oil stain removal, these strategies keep your pavement functional and curb appeal high without hiring pros.
Contents
- Essential DIY Asphalt Maintenance Steps
- Common DIY Asphalt Maintenance Mistakes to Avoid
- Best Tools & Products for Asphalt Maintenance
- Preventative Maintenance Strategies for Asphalt
- Eco-friendly Asphalt Maintenance Solutions
- Frequently Asked Questions (FAQ)
- Final Thoughts on DIY Asphalt Care
- Useful References for You:
Essential DIY Asphalt Maintenance Steps
Proactive care stops minor issues from turning into costly fixes. Follow this action plan to shield your pavement from daily strain and harsh conditions.
1. Regular Cleaning for Asphalt Preservation
Weekly sweeping with a stiff-bristle broom stops dirt buildup that grinds against surfaces. For oil stains, apply a trisodium phosphate (TSP) mix within 48 hours to avoid binder breakdown. Use a gas-powered washer at 3,000 PSI max—higher pressure strips sealants. Focus on clearing debris from joints to block water infiltration.
2. Crack Sealing to Prevent Water Damage
Fill cracks >1/4″ using rubberized asphalt filler, which flexes with temperature shifts. Clean cracks with a wire brush before applying material at 50°F or warmer. For hairline fractures, opt for liquid crack sealer with a nozzle applicator. This stops H2O from penetrating sublayers and causing frost heave or potholes.
3. Timely Sealcoating for Surface Protection
Apply coal-tar or asphalt-based sealant every 24-36 months. A single coat adds UV resistance and restores faded pavement. Use a squeegee for thin, uniform layers. Let it dry 24-48 hours—walking on it too soon leaves scuff marks. This $0.15-$0.25/sq ft investment blocks oxidation and fuel spills.
4. Pothole Repair Using Asphalt Cold Patch
Fix potholes fast with cold mix asphalt, which bonds without heating. Chip away loose chunks, compact 2-3″ of gravel base, then layer patch material 2″ above surrounding pavement. Tamp down with a hand tamper—vehicle tires finish compaction. This stops potholes from spreading and tripping hazards.
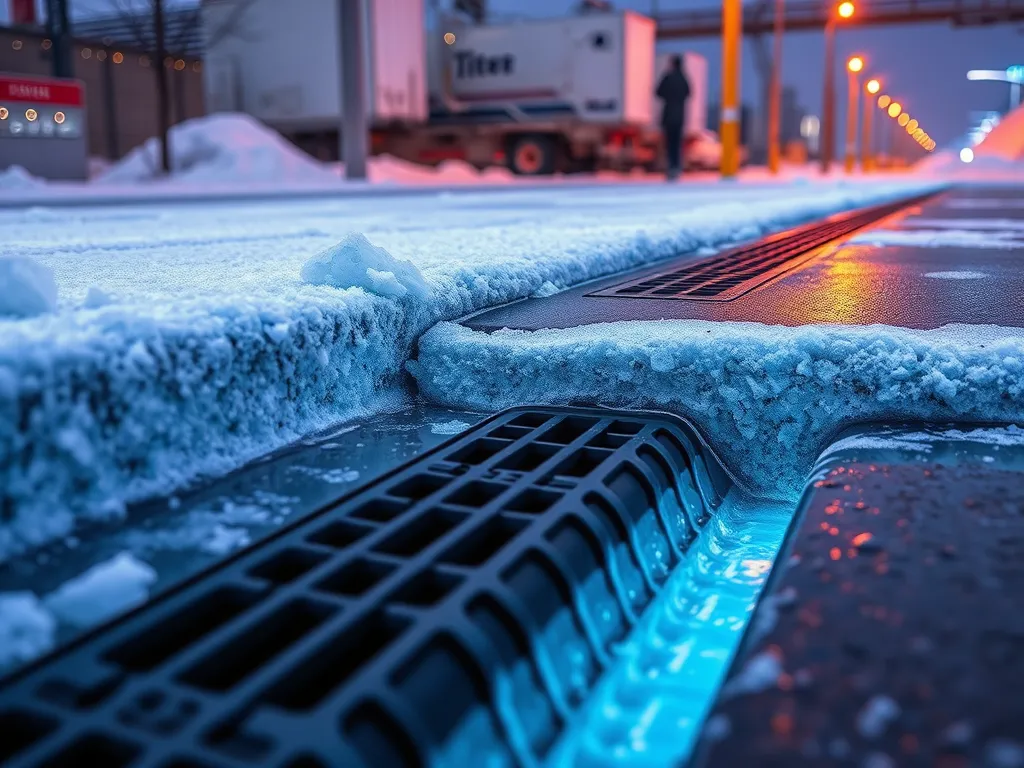
5. Proper Drainage Management
Check that pavement slopes 1-2% away from structures. Clear clogged drains monthly using a plumbing snake. Install channel drains along low spots. For yards, build swales with 6″ depth to redirect runoff. Standing water softens asphalt bases, causing alligator cracking and sinkholes.
Avoiding common pitfalls starts with knowing what not to do—up next, we’ll show typical errors DIYers make and how to sidestep them.
Common DIY Asphalt Maintenance Mistakes to Avoid
Even small errors in DIY asphalt care can cause cracks, raise costs, and cut pavement life short. Spotting these slip-ups early saves time, money, and hassle down the road.
1. Delaying Sealcoating Beyond 2-3 Years
Wait longer than three years to sealcoat, and UV rays dry out the asphalt binder. This leads to brittle surfaces and spiderweb cracks. Reapply sealant every 24-36 months using 0.35-0.45 gallons per square yard. Late spring or early fall applications prevent rapid drying in extreme heat.
2. Using Incorrect Crack Fillers for Asphalt
Concrete fillers crumble in asphalt gaps. Use rubberized asphalt emulsion instead. For cracks wider than 1/4 inch, opt for hot-pour crack sealants that flex without splitting. Cold pour tubes work for thin cracks but need reapplication every 1-2 years.
3. Ignoring Small Cracks & Drainage Issues
Unfilled hairline cracks let water reach the base layer. Winter freezes expand these gaps by 9-12% annually. Keep drains clear and check slopes (2% minimum grade) to stop water from pooling near edges or seams.
4. Applying Sealant in Unsuitable Weather
Sealcoating below 50°F or above 85°F causes poor adhesion. Humidity over 70% slows curing, while rain within 24 hours washes away fresh coats. Track weather apps and aim for 72-hour dry spells before starting.
5. Overlooking Oil Stain Cleanup
Oil breaks down asphalt binders in 48 hours. Blot fresh spills with kitty litter, then scrub with trisodium phosphate (1 cup per gallon). For old stains, use a stiff brush and degreaser before rinsing with a pressure washer under 1,200 PSI.
Nailing these basics keeps your pavement strong. Up next: the top tools and gear to tackle asphalt upkeep like a pro.

Best Tools & Products for Asphalt Maintenance
Pick the right gear to keep your asphalt strong. Top-grade tools boost results while cutting work time by half in some cases.
1. Asphalt-specific Crack Fillers
Use rubber-based fillers made for blacktop. These bend with heat and cold, stopping water from breaking bonds. Look for brands like Red Devil or Latex-ite with 300% stretch rates.
2. High-quality Sealcoating Products
Coal tar or asphalt-based sealers shield surfaces from sun and spills. A 5-gallon pail covers 250-400 sq ft. Apply with a brush or spray rig for even coats.
3. Cold Mix Asphalt for Pothole Repairs
Pre-mixed bags work in any weather. Press this sticky blend into holes, then tamp down. UPM Cold Patch bonds tight, even in rain or snow.
4. Stiff-bristle Brooms & Pressure Washers
Sweep grit off weekly with heavy brooms. For deep cleans, use washers at 3000 PSI max. Too much force can strip sealant layers.
5. Protective Gear for DIY Safety
Wear thick gloves, goggles, and N95 masks. Sealcoating fumes need air flow. Steel-toe boots guard feet when tamping patches.
With these tools in hand, your next step is learning when and how to use them. Smart timing boosts their impact on your blacktop’s health.
Also See: Causes Of Asphalt Driveway Cracking
Preventative Maintenance Strategies for Asphalt
Proactive care keeps asphalt strong. Plan ahead with these three methods to stop wear before it starts.
1. Seasonal Asphalt Care Checklist
Spring: Clear dirt from cracks with a stiff broom. Check for winter damage by May. Summer: Sealcoat when temps hit 50-85°F. Fill cracks by August. Fall: Remove leaves weekly to stop stains. Winter: Shovel snow fast. Use plastic tools, not metal. Spread ice melt with <5% salt content.
2. Weather Impact Mitigation Techniques
Sun breaks down binders in asphalt. Apply UV-block sealcoat every 2-3 years. Fix small cracks fast – 1/4″ gaps let in 300% more water. Before frost, use calcium chloride ice melt (safer than rock salt). Slope drains 2% away from pavement edges to stop pooling.
3. Traffic Pattern Adjustments
Heavy loads cause 80% of rutting. Rotate parking spots for cars. Add wheel stops to limit drive-on points. For roads, mark lanes to spread tire wear. Block trucks over 5,000 lbs on home driveways. Use traffic cones to guide flow during repairs.
Smart upkeep cuts long-term costs. Now explore green methods that protect both pavement and planet.
Eco-friendly Asphalt Maintenance Solutions
Keep your asphalt green while keeping it clean. Use these earth-smart methods to care for your pavement.
Biodegradable Cleaners for Asphalt
Swap harsh chemicals for plant-based cleaners. Brands like Simple Green or BioClean cut grease and oil stains without harming grass or soil. Mix 1 part cleaner with 5 parts water in a spray jug. Scrub with a stiff broom, then rinse. Safe for DIY use and pets.
Recycling Asphalt Debris
Crush old chunks into gravel-size bits for reuse. Fill potholes or level dips with this recycled base. Rent a plate compactor ($45/day) to pack debris tight. Asphalt is 95% recyclable—saves $30 per ton vs new mix. Check local plants that take RAP (Recycled Asphalt Pavement).
Low-voc Sealcoating Options
Pick water-based sealers with under 100g/L VOC. SealMaster GreenArmor or GemSeal EcoGuard dry fast (2-3 hrs) and last 3+ years. Apply thin coats with a squeegee—1 gallon covers 80 sq ft. Low fumes mean no masks needed for most DIY jobs.
Ready to boost your skills? Learn which tools make these tasks faster and safer in the next section.
Frequently Asked Questions (FAQ)
How Do You Maintain Asphalt Effectively at Home?
Maintaining asphalt effectively at home involves regular cleaning, crack sealing, timely sealcoating, pothole repairs, and ensuring proper drainage. Establish a routine to regularly inspect your asphalt and perform necessary maintenance tasks, such as filling cracks and cleaning debris, to prevent further damage.
What Routine Maintenance Extends Asphalt Lifespan?
Routine maintenance that extends the lifespan of asphalt includes cleaning the surface frequently to remove debris, sealing cracks using appropriate fillers, applying a sealcoat every 2-3 years, and ensuring effective drainage to prevent water pooling. Addressing these elements helps maintain the integrity of your pavement.
How Can I Keep My Asphalt Driveway Looking New?
To keep your asphalt driveway looking new, implement regular sweeping to remove dirt and debris, promptly clean oil stains, apply sealcoating every few years, and fill cracks immediately to prevent them from growing. Keeping your driveway clear of obstacles and debris will also help maintain its appearance.
When Should DIY Asphalt Repair Be Avoided?
DIY asphalt repair should be avoided when the damage is extensive, such as large-scale cracking or multiple potholes, that requires professional evaluation and remedial work. Additionally, if the weather conditions do not permit proper coating application or if you lack the necessary tools, it’s best to consult a professional.
Final Thoughts on DIY Asphalt Care
Maintaining your asphalt is a commitment that pays off. Regular care enhances durability and appearance, ensuring your pavement lasts longer. Consistency is key! Make cleaning, sealing, and repairs a part of your routine to avoid costly replacements.
While DIY methods suit many tasks, it’s crucial to recognize when to call in the pros. Complex issues or extensive damage often require professional inspections and repairs for the best results.
Start your maintenance routine today! For more information and tips, check out Asphalt Calculator USA. Your asphalt deserves the best care possible, and with the right approach, you can effectively protect it for years to come.
Useful References for You:
- Lavin, P. (2003). Asphalt Pavements: A Practical Guide to Design, Production, and Maintenance for Engineers and Architects. London: Taylor & Francis.
- How to Maintain Your Asphalt Driveway | McConnell & Associates
- Asphalt Repair Driveway: DIY Fixes for a Smooth Ride
- The Ultimate Guide to Asphalt Maintenance | Angi
- Asphalt Maintenance for DIYers – Asphalt Kingdom

