DIY Asphalt Driveway Repair: A Step-by-step Guide to Fixing Cracks and Potholes
Published on: November 14, 2025 | Last Updated: April 14, 2025
Written By: George Voss
DIY asphalt driveway repair lets homeowners fix surface damage like cracks and potholes using specialized materials and basic tools. Unlike professional asphalt paving (which costs $3-$7 per square foot), DIY repairs cut expenses by 60% with products like cold mix asphalt ($15-$40 per bag) and rubberized crack fillers. This approach works best for small areas under 4 square feet – ideal for hairline cracks up to 1/4″ wide or potholes less than 6″ deep. You’ll need asphalt-specific tools like tampers, squeegees, and crack-sealing bottles available at hardware stores.
This guide walks through every phase of asphalt repair. Learn to identify four types of driveway damage, choose between liquid crack fillers and patching compounds, and master compaction techniques. We’ll cover material quantities using the Asphalt Calculator USA formula (length x width x depth x 145 lbs/cubic foot), compare repair methods like overlaying vs. spot fixes, and share pro tips for lasting results. Up next: how to assess your driveway’s condition and prevent small issues from becoming costly replacements.
Contents
- Assessing Damage: When to Repair Your Asphalt Driveway
- Essential Tools for DIY Asphalt Driveway Repair
- Materials Needed for Asphalt Driveway Repairs
- Step-by-step Asphalt Driveway Repair Process
- Pros and Cons Of DIY Asphalt Repairs
- Maintaining Your Repaired Asphalt Driveway
- Environmental Considerations for Asphalt Maintenance
- FAQ: DIY Asphalt Driveway Repair Questions
- Closing Thoughts
- Additional Resources for You:
Assessing Damage: When to Repair Your Asphalt Driveway
Spotting early signs of wear keeps small asphalt driveway repairs manageable. Look for these four trouble areas before planning your DIY asphalt driveway repair project.
Identifying Common Asphalt Driveway Issues
Three out of four asphalt driveways show visible damage within eight years. Catching problems early saves money and prevents full-depth asphalt failure.
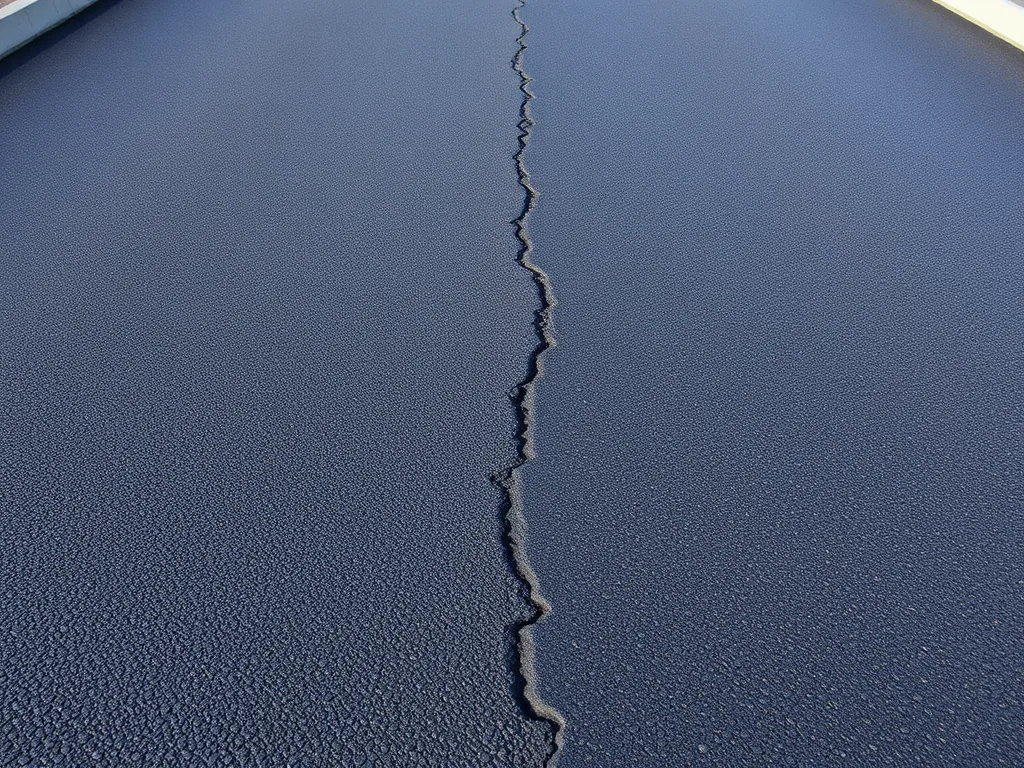
Cracks (Hairline to Large Asphalt Cracks)
Hairline cracks under 1/4″ wide need quick asphalt crack repair with emulsion sealant. Alligator cracks (interconnected web patterns over 1/2″ wide) signal base layer failure – clean out debris and fill with rubberized asphalt crack filler. Left unsealed, water seeps through cracks and erodes the subbase at 2-3 times normal rates.
Potholes in Asphalt Surfaces
Potholes form when cracked asphalt breaks free, leaving bowl-shaped gaps. Fix asphalt driveway potholes when they reach 2″ deep or 6″ wide. Use cold mix asphalt patch material for repairs under 4 square feet. Larger holes may need professional infrared asphalt repair for lasting results.
Raveling and Surface Deterioration
Raveling appears as loose gravel on your asphalt driveway surface. This occurs when aggregate separates from the asphalt binder. Apply asphalt driveway sealant every 2-3 years to prevent raveling. For severe cases, scrub loose stones away and apply a 1/4″ thick asphalt overlay.
Buckling or Settling Areas
Sunken spots or raised ridges indicate soil movement beneath the asphalt. Small settled areas (under 1″ drop) can be leveled with sand mix. Buckling over 2″ high often requires cutting out damaged sections and patching asphalt driveway surfaces with fresh hot mix.
Once you’ve mapped problem areas, gather the right tools to tackle your asphalt driveway repairs efficiently.
Essential Tools for DIY Asphalt Driveway Repair
Proper tools make the difference between a temporary fix and lasting results. Gather these specialized items before tackling cracks, potholes, or surface flaws in your driveway.
Asphalt-specific Repair Equipment
Standard garden tools won’t handle asphalt’s unique demands. Use gear designed for bituminous materials to achieve professional-grade compaction and adhesion.
Asphalt Tamper or Compaction Tools
- Hand tampers (10-15 lbs): Compact small patches with steel-base models
- Plate compactors (150+ lbs): Rent gas-powered units for areas over 5 sq ft
- Vibratory rollers: Optional for full-depth repairs exceeding 3 inches
Asphalt Rakes and Trowels
- Tempered steel rakes: Spread cold mix without tearing aggregate
- Notched squeegees: Apply tack coat at 0.05 gal/sq yd rates
- Luting trowels: Smooth edges on fresh asphalt patches
Crack Filling Squeeze Bottles
- Pourable nozzles (3/8” width): Handle cracks up to 1/2” wide
- Pressurized applicators: Force filler into voids below surface
- Temperature-resistant tubes: Work with rubberized fillers up to 400°F
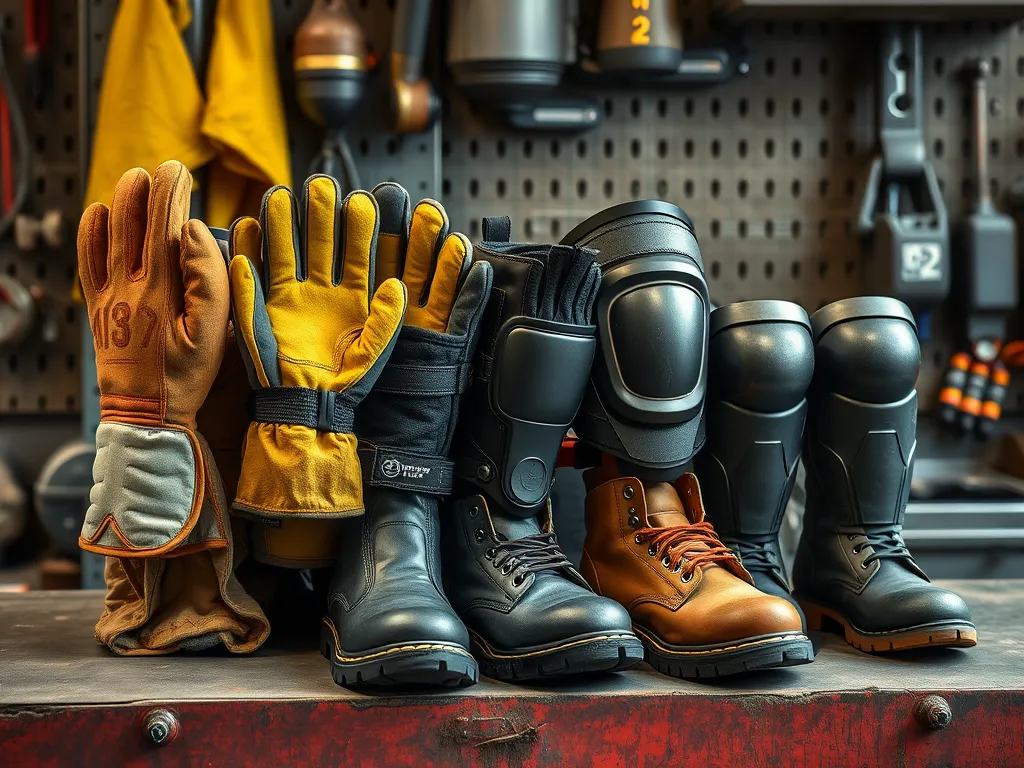
Safety Gear for Asphalt Work
Protect against burns, fumes, and impact during driveway repairs. Never skip these critical items:
- ANSI Z87.1 safety glasses: Block flying debris during chiseling
- N95 respirators: Filter asphalt volatile organic compounds (VOCs)
- Heat-resistant gloves: Handle materials up to 350°F safely
- Steel-toe boots: Prevent crush injuries when moving heavy tools
- Knee pads with hard shells: Protect joints during prolonged work
With the right tools and protective gear ready, focus shifts to selecting quality materials for durable fixes. Next, we’ll break down optimal asphalt mixes, sealants, and bonding agents for various repair types.
Materials Needed for Asphalt Driveway Repairs
Gathering the right materials ensures your DIY asphalt driveway repair lasts. Match products to your driveway’s specific issues for best results.
Cold Mix Asphalt Patch for Small Repairs
Use cold mix asphalt for potholes under 2 inches deep. Sold in 50lb bags ($8-$15), this premixed material bonds without heating. Store unused patches in sealed containers to prevent drying. Works best at temperatures above 40°F.
Asphalt Crack Filler and Sealants
Choose products based on crack width:
- Rubberized filler ($25/gal) for cracks wider than 1/2″
- Liquid crack sealer ($18/gal) for hairline gaps
Coverage: 1 gallon fills 150 linear feet of 1/4″ cracks. Apply using pour bottles or caulk guns for precision.
Tack Coat for Layer Adhesion
This asphalt emulsion ($30-$45 per 5-gallon) bonds new layers to existing pavement. Apply at 0.05 gal/sq yd using garden sprayers. Dries in 30-60 minutes. Keep pets away during application.
Quality Asphalt Driveway Sealant
Coal-tar-based sealers ($25-$40 per 5-gallon) outlast asphalt-emulsion types. Covers 450 sq ft per pail. Use stiff-bristle brooms for even spreading. Apply two coats in temperatures above 50°F for maximum protection.
With materials prepped, let’s walk through the repair process to transform these supplies into lasting fixes.
Also See: Asphalt Type Selection Guide: Choosing the Right One
Step-by-step Asphalt Driveway Repair Process
Take charge of your driveway’s condition with these proven asphalt repair techniques. Proper execution at each stage ensures lasting results for your DIY asphalt driveway repair project.
Preparing the Asphalt Surface
Surface prep determines repair longevity. Skip this step, and cracks will reappear within months.
Cleaning and Degreasing Asphalt
Power wash the repair area at 3,000 PSI minimum. Remove oil stains with trisodium phosphate (TSP) solutions – 1 cup TSP per gallon of warm water. Let dry 24 hours before repairs. Debris-free surfaces improve asphalt crack filler adhesion by 60%.
Routing Out Damaged Asphalt Areas
Use an electric asphalt router to cut clean edges around cracks. Create 1” wide x 1.5” deep channels for optimal filler bonding. Remove loose aggregate with a wire brush until reaching stable base layers.
Repairing Asphalt Cracks
Different crack widths demand specific solutions. Match the fix to the damage for professional-grade results.
Filling Hairline Cracks with Asphalt Emulsion
Pour PG 58-28 asphalt emulsion into cracks <¼” wide using a funnel applicator. Smooth with a rubber squeegee. This flexible filler expands/contracts with temperature swings from -20°F to 120°F.
Patching Large Cracks with Rubberized Asphalt Filler
Force ASTM D6690-certified rubberized filler into cracks up to 2” wide using a caulk gun. Overfill by ¼”, then compact with a hand tamper. This elastic compound withstands freeze-thaw cycles better than standard mixes.
Fixing Asphalt Potholes
Pothole repairs fail without proper depth prep and compaction. Follow these steps to prevent sinkholes.
Applying Cold Mix Asphalt Patch
Fill holes 2” deeper than the existing base. Layer QPR Cold Patch in 3” lifts, sloping edges upward. Leave ½” above surrounding pavement – it compacts downward during finishing.
Proper Compaction Techniques
Compact each layer with a 150-lb plate compactor or hand tamper. Achieve 92% density using the “overlap method”: make 3 passes vertically, then 3 horizontally. Check for hollow sounds indicating poor compaction.
Overlaying Existing Asphalt Driveway
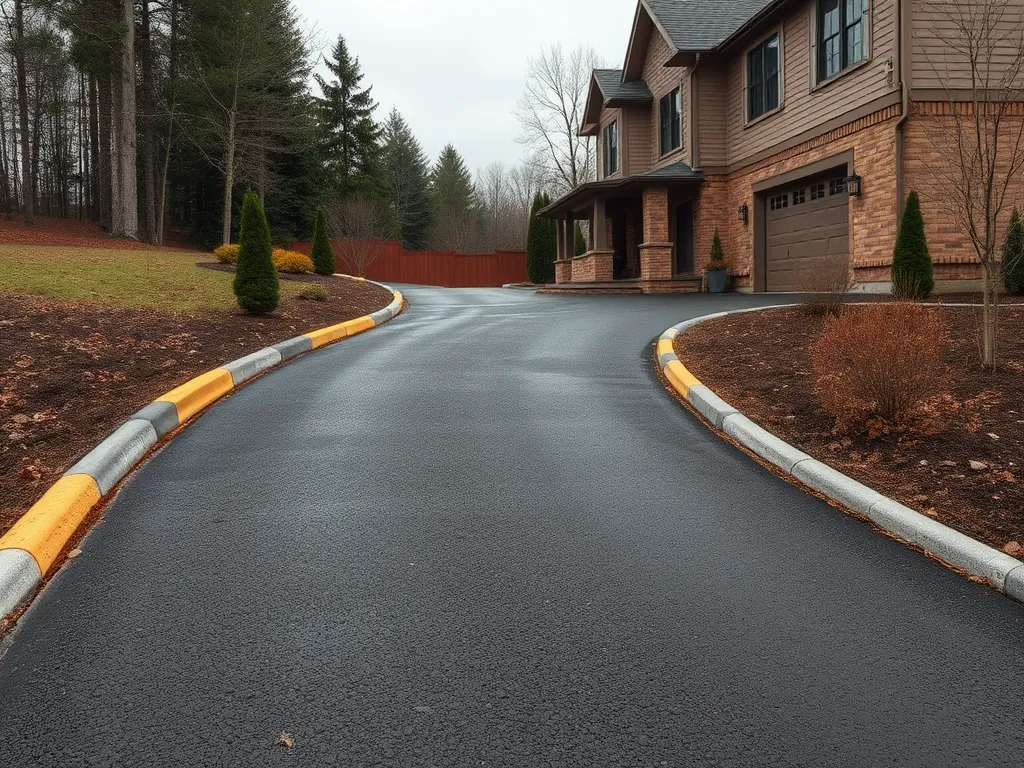
Resurface when >30% of the surface shows raveling or alligator cracks. This DIY asphalt driveway repair method adds 8-12 years of life.
When and How to Add New Asphalt Over Old
Apply SS-1h tack coat at 0.05 gal/sy rate. Lay 1.5” thick hot mix asphalt (HMA) within 24 hours. Use a lute rake to spread mix evenly. Compact immediately while temperatures stay above 50°F.
With repairs complete, weigh your project’s cost-effectiveness against professional alternatives. Up next: comparing DIY results to contractor-grade work.
Pros and Cons Of DIY Asphalt Repairs
Homeowners tackling asphalt driveway repair face trade-offs between budget control and expert outcomes. Weighing these factors helps determine whether a do-it-yourself approach fits your needs.
Cost Savings Vs Professional Results
DIY asphalt driveway repair cuts labor costs by 60-80% compared to hiring contractors. Materials like cold mix asphalt patches cost $0.50-$2 per square foot, while professional services average $3-$7. But savings come with limitations: hand tools rarely match commercial-grade equipment, and untrained applications may leave visible seams or uneven surfaces. Professional crews use infrared heaters for seamless patches and achieve 95%+ compaction rates with roller machines.
Longevity Of DIY Asphalt Fixes
Properly executed DIY repairs last 1-3 years, versus 5-8 years for professional work. Factors like weather exposure, traffic load, and material quality affect durability. Cold-patch asphalt requires 30-40 compaction passes with a hand tamper to reach optimal density, while hot-mix applications by pros bond better with existing pavement. Cracks filled with rubberized sealant resist water infiltration longer than basic asphalt emulsion products.
Regular upkeep after repairs plays a key role in preserving your driveway’s condition. Let’s explore maintenance strategies that protect your work.
Maintaining Your Repaired Asphalt Driveway
Keep your fixed driveway strong with smart care. Good upkeep stops new cracks and adds 5-10 years to your asphalt’s life.
Sealcoating Schedule for Asphalt Preservation
Apply fresh sealcoat every 2-3 years. Use asphalt-based sealants with 60-70% solids for best wear. Wait 30 days after repairs before sealing. Spread in dry weather above 50°F for even curing. Sealcoating blocks UV rays and stops water from eating through the binder.
Preventing Future Asphalt Damage
Stop problems before they start. Two key moves keep your driveway intact: smart weight plans and water control.
Proper Weight Distribution on Asphalt
Park heavy gear on plywood sheets to spread weight. Avoid RV or truck loads over 10,000 lbs on home driveways. Rotate parking spots if you have many cars. Use wheel stops to prevent tire digs near edges.
Managing Water Drainage
Keep water flowing off the slab. Slope your driveway at 2% (1/4″ per foot) away from your home. Clear dirt from edges so rain runs off fast. Add a catch basin or French drain if puddles form. Fix gutter spills that hit the same asphalt spot.
Smart care now saves big repair jobs later. Next, learn how eco-friendly choices can boost your driveway’s green cred while keeping it solid.
Environmental Considerations for Asphalt Maintenance
DIY asphalt driveway repair impacts local surroundings. Smart material choices and disposal habits cut down harm to nature while keeping your project budget-friendly.
Eco-friendly Asphalt Repair Options
Opt for recycled asphalt pavement (RAP) mixes containing 30-50% reused materials. This mix matches virgin asphalt in quality but cuts costs by up to 30%. Cold patch asphalt works for small fixes without needing high-temp tools, lowering fuel use during application. Bio-based crack fillers made from plant oils tackle gaps up to 1/2 inch wide while releasing 60% fewer volatile organic compounds (VOCs) than standard options.
Proper Disposal Of Asphalt Debris
Old asphalt chunks from DIY jobs stay 100% recyclable. Many asphalt plants accept clean debris for processing into new pavement. Contact local recycling centers first—some charge $15-$30 per ton. Avoid dumping in landfills; 42 states ban asphalt from trash sites. For small amounts, crush chunks with a sledgehammer to use as temporary fill for yard ruts.
Looking to confirm your fix will hold? Our FAQ section breaks down cure times and common DIY asphalt repair questions.
FAQ: DIY Asphalt Driveway Repair Questions
Can I Successfully Patch Asphalt Driveway Cracks Myself?
Yes, many homeowners can successfully patch asphalt driveway cracks using the right materials and techniques. By following a step-by-step approach and using quality products like rubberized fillers or emulsion sealants, you can achieve satisfactory results. Just be sure to carefully assess the damage before starting and allow ample time for cure after repairs.
How Thick Should New Asphalt Be Over Old Driveway Surfaces?
When overlaying new asphalt over an old driveway, aim for a thickness of at least 1.5 inches for optimal results. This ensures proper bonding and longevity of the new surface. Make sure to apply a tack coat between layers to enhance adhesion.
What Temperature is Best for Asphalt Repairs?
The best temperature for asphalt repairs is between 50°F and 90°F. Warmer temperatures allow for better compaction and bonding of materials. Avoid repairs during extremely cold or wet weather, as this may compromise the integrity of the asphalt patch.
How Long Does DIY Asphalt Repair Last Compared to Professional Work?
DIY asphalt repairs typically last between 1 to 3 years, depending on factors such as material quality, weather conditions, and the extent of traffic. In contrast, professionally installed repairs can last 5 to 8 years due to the use of advanced techniques and equipment that achieve higher compaction and smoother finishes.
Closing Thoughts
Repairing your asphalt driveway can be a satisfying and cost-effective project. With the right tools, materials, and steps, you can address cracks, potholes, and surface issues efficiently. This proactive approach not only enhances the appearance of your property but also extends the lifespan of your driveway.
Remember to maintain your newly repaired surface through regular sealcoating and by managing water drainage effectively. These practices will help prevent future damage and keep your driveway looking great.
For more insights and materials relevant to your DIY asphalt driveway repair project, check out Asphalt Calculator USA. Your successful asphalt repair journey starts here!
Additional Resources for You:
- American Association of State Highway and Transportation Officials (AASHTO). (2008). Mechanistic-Empirical Pavement Design Guide (MEPDG). Washington, DC: AASHTO.
- How to repair street end of driveway that has loose asphalt? – Home Improvement Stack Exchange
- DIY driveway repair/ restoration
- Asphalt Damage & Driveway Restoration Methods
- r/howto on Reddit: Is there a way to DIY repair this without a whole new driveway?

